(Manual built for phpGraphy release 0.9.13a)
Copyright © 2005, 2006 JiM / aEGIS
Abstract
phpGraphy is is a free PHP script that let you share your pictures on your personal website in a very convenient way.
The lastest version of this manual can be found online on the phpGraphy website. Comments are very welcome.
Table of Contents
- Preface
- 1. Introduction
- 2. Installation
- 3. Using phpGraphy
- 3.1. Quick Tour
- 3.2. Understanding security levels
- 3.3. Managing users accounts
- 3.4. Uploading pictures/files
- 3.5. Changing picture title
- 3.6. Changing picture/directory security level
- 3.7. Editing the .welcome
- 3.8. Special pages
- 3.9. Deleting visitors comments
- 3.10. Manual handling of thumbnails
- 3.11. Setting/Removing Directory Cover
- 3.12. Thumbnail/Lowres pictures generation
- 4. phpGraphy configuration
- 5. Customization of phpGraphy
- 6. phpGraphy and Security
- Glossary
- A. Appendix
List of Figures
List of Tables
Table of Contents
Because even the best software ever is nothing without a proper documentation, writing a proper decent one was my first priority when I officialy took the maintenance of phpGraphy.
As an experienced computer's user, I generally only read the first three lines of a documentation and then run the software directly and learn by using it, but sometime when it's either a complex software or if I really want to know all the tricks that I could use with a software, then the documentation is my reference. I've too often see nice softwares with a poor documentation ! So I hope you'll find this document useful either as a starting point or as a reference book. I've tried all along the writing to keep it easy to read and accessible even for non IT specialists but a minimum basis is somehow required !.
- Experienced users
As an experienced user, you'll probably only want to read this manual if you encounter a problem that you don't know how to solve or maybe simply you're interested on how to get the best of phpGraphy. If you're stuck while trying to resolve a problem, consult the Troubleshooting section which give you some baseline on where to look. To get the best part of phpGraphy, briefly read the Table of contents to locate the chapters that might interest you.
- New users
First of all, I would suggest you to read the Quick Tour to get a better idea of what you can do with phpGraphy. Then install it using the Installation Procedure and well I think that's about it really for a start :)
- Constant width
Used for commands, command output, and switches
-
Constant width italic Used for replaceable items in code and text
- Constant width on gray background (not shown here for technical reasons :)
Used for file content
-
Italic Used for file and directory names
-
Note Box
Note
Something that doesn't really fit into the text but might be interesting to know
-
Tip box
Tip
If you really want to use all the power of phpGraphy, mind thoses ones !
-
Warning box
Warning
When it's important that you DON'T MISS an information
Table of Contents
phpGraphy is a free PHP script released under GPL license that let you share your pictures on your personal website in a very convenient way. It has been written with the goal to be very customizable so it can integrate itself easily within your existing website (it's also works perfectly well by itself).
phpGraphy has originally been written by Christophe Thibault in year 2000, he has driven the project for almost a year, from the first release 0.9 up to release 0.9.7. Then he become too busy to continue improving the application.
I decided to continue to add the features that where missing to me. At the end of last year (in 2004), while chatting with Christophe, I told him about the modifications I've made etc. and that's how we came to "Hey but why won't you take the project maintenance ?".
Since, another developer (and now friend), oniryx, has joined the ranks and we're both doing our best to continuously improve the application.
FIXME:UpdateWeb/SynchronizeHere!
On-the-fly Thumbnail/Low resolution picture generation
Unlimited Categories and Sub-categories (it uses directories)
Integrated fast text database mode (MySQL also supported if prefeered)
Users comments
Rating system
Web interface management
Picture upload via web interface (or via FTP)
Top rated/Last commented/Last added pictures pages
Slideshow mode
User level support, so you can hide some pictures from unwanted people
EXIF/IPTC metadata support
Lossless JPEG rotation (via exiftran/jpegtran)
Video, sound and text files support
Themes including templates, header/footer and language file
Following W3C standards - XHTML 1.1 / CSS 2.0 Valid
Multilingual support (See TranslatorPage for complete list and status)
Installation Wizard
Highly configurable / Easily customizable
Free (under GPL license)
Table of Contents
Checklist:
A WebServer with PHP 4.1.0 or greater (PHP 4.3.x recommended)
Note
phpGraphy can run even on a safe_mode enabled server but be aware that others restrictions might apply
There isn't much required to run phpGraphy (as shown in the list above) but it might still be difficult or even impossible to make it run on some highly restricted hosts. If you encounter any problems, don't give up to fast, ask for help first !
This part is for experienced users only ! If you're not that familiar with IT, then please prefeer the detailed installation procedure which is much more detailled and provide help and explanations for every step.
Get the archive, unpack it and upload the content on your webserver
Open your web browser to the address where you've just put phpGraphy and you should see the installation process
Just follow the steps and that should be it !
This procedure describe every step in order to get phpGraphy running on your webserver
Download the latest version of phpGraphy from the official phpGraphy website, there is currently 2 differents archives (.zip and .tar.gz), most of Windows users might prefeer the .zip format while *nix users might prefeer the tar.gz one.
Unpack the archive using your favorite compression program (ie: Winzip for Windows users)
Upload the archive content on your webserver using your favorite FTP Client
Using your webbrowser, open the address of your website followed by the location of phpGraphy
ie: http://www.mysite.com/phpgraphy/
You should be automatically redirected to the installation process, if not add 'install.php' after phpGraphy directory (ie: http://www.mysite.com/phpgraphy/install.php)
Follow the steps on your screen, it should be pretty straight forward but I'll list below those that might not be for everyone and also guide you to understand through the eventual(s) problem(s) you might encounter.
Step 3, "Directories Permissions" - phpGraphy need to be able to write in some directories or files, on some configuration, the user used to run the webserver is not the same as the one you'll use to connect via FTP (called respectivly webuser and ftpuser) {FIXME: Include link to document that explain this}. In this particular case, you'll have to change the permissions of the files/directories to world-writable (also know as 777) using your FTP client. because every FTP client is different I won't be able to explain here how to do it exactly but search in the documentation or the menu for chmod (in command line FTP, you would have to type chmod +x or chmod 777 followed by the filename or the directory name).
Step 4, "Image Tools Configuration" - My advice on this step is if you don't understand, just click on "Next Step" ! Basically, phpGraphy does the job for you, it detects the best choices and if it doesn't, it's very likely that the option is not available. The image rotation is only available through external tools (exiftran/jpegtran) which require the use of exec() and this function is very often restricted on shared servers.
Step 5, "Database configuration" - Again, if you're unsure, just click on "Next Step". For those interested to understand, the use of "Flat files" is a good choice unless you're planning to put a huge number of pictures (more than 5000). So now, you can guess that MySQL is recommended when you've a lot of pictures as it's gonna be more efficient. The real advantage of the flat file is that you don't have anything to configure, it's just working. Also you can backup (replicate) your site more easily.
Once you've setup your administrator account, you'll be able to access your site and you'll see some guideline to test it. Simply follow them.
To finish, the last step is to check the security of your site by reading the instructions to check that your installation is secure.
Warning
Before upgrading an existing installation, please do a BACKUP, I can not stress that enough as if anything goes wrong (even if it shouldn't), you could really regret not to have oneInstructions for upgrade are located under the docs/ subdirectory of phpGraphy in a file called UPGRADE. It's kept here so that even users with just a shell access can easily access it.
Table of Contents
- 3.1. Quick Tour
- 3.2. Understanding security levels
- 3.3. Managing users accounts
- 3.4. Uploading pictures/files
- 3.5. Changing picture title
- 3.6. Changing picture/directory security level
- 3.7. Editing the .welcome
- 3.8. Special pages
- 3.9. Deleting visitors comments
- 3.10. Manual handling of thumbnails
- 3.11. Setting/Removing Directory Cover
- 3.12. Thumbnail/Lowres pictures generation
phpGraphy has been designed to be very easy to use, you will probably be able to learn by yourself how to use it. However, as a reference, this chapter explain the differents available actions and concepts.
This section describe one by one all references of the Screenshot when loggued in as admin. It will also link to specific sections contained in this chapter.

- A1
This menu contain more options once you're authenticated as admin. As of current version, here is a list of what you can do directly from there:
Create new directories
Manage users (login, password and security level)
Change phpGraphy settings (almost every option can be tuned from there, see Changing the configuration)
View logfile (the last 20 lines - this can be handy to troubleshoot a problem)
Upload files (either from your computer or from another website)
Generate all thumbnails/lowresolution pictures (Note that they'll be generated on the fly anyway when an image is requested by a visitor)
- B1
You can add/edit the current image title. When a image has a title, it's displayed instead of the filename. Note that phpGraphy can automatically add a title to a picture using a given IPTC field. Read Changing picture caption/description for details.
- C1, C2
Those two numbers are respectively the real security level of the picture and the Inherited one. For details about this, read Understanding security levels.
- C3
This button is used to validate changes that you've made to picture's details (eg: title or security level change).
- C4
This button will properly delete the picture from phpGraphy. It will not only remove it physically from the hard disk but also remove all references (comments/ratings/etc.).
- C5
This button will delete the thumbnail and low-resolution of the current picture. It may be used in cases which you're not happy with the current thumb/lowres.
- D1
Clicking on this link will delete the associated visitor comment.
- M1
This icon will appear when IPTC metadata are found inside the picture.
- M2
This is picture's metadata, you can customize the way it's displayed, for more details please read Display of EXIF/IPTC metadata.
Protecting directories and pictures under phpGraphy is made using security level, it's important to understand how it's working to not deny access to pictures you want to be available from everyone, the other case (allowing access to unauthorized pictures is less likely to happen, you'll see why soon).
First, please note that levels are starting from zero (simple non loggued visitors) and go up to 999 (administrator). This mean that you can have up to 998 differents levels which should hopefuly be enough for everyone.
It may sound evident for most of you but in case, the bigger level you've, the most pictures/directories you'll be able to see. As said before, admin functions are only available if the user level is equal to 999.
Ok, so now that I've introduced the levels, there is another important thing to understand, the notion of "inheritance".Basically, when accessing a picture or a directory, phpGraphy check both "real" and "inherited" security level and keep the highest one. The inherited one is found by checking the level in all the tree hierarchy below the current picture/directory.
Here is a real life example:
pictures_dir/          <- Level 0 - Inherited Level: 0
|
+- public_dir_a/       <- Level 0 - Inherited Level: 0 (becaused root_dir level is also 0)
|  |
|  +-public_dir_b/     <- Level 0 - Inherited Level: 0 (becaused 'root_dir' AND 'public_dir_a' level is also 0)
|  +-private_dir_a/    <- Level 10 - Inherited Level: 10 (becaused 'root_dir' AND 'public_dir_a' level are both 0,
|     |                                                    it's heritate from it's own level which is the highest found)
|     `-private_dir_b/ <- Level 0 - Inherited Level: 10 (because 'private_dir_a' level is 10, no need to worry
|                                                        to get access to this directory, user will need to have level 10)
`- private_dir_c/      <- Level 10 - Inherited Level: 10 (same case as 'private_dir_a')
   |
   +-public_dir_d/     <- Level 0 - Inherited Level: 10 (Do not do this, this not a public directory as its inherited level
   |                                                     is 10, user will also need to have level 10 to read it)
   `-private_dir_d/    <- Level 20 - Inherited Level: 20 (Because level 20 is the highest found in the directory tree,
     |                                                    all directories behind this one will inherite this level of 20)
     `private_dir_e/   <- Level 0 - Inherited Level: 20
Note
To check security level of a picture/directory, you'll have to look at the two values found on the Screenshot when loggued in as admin. C1 is the real security level (assoctiated to the picture/directory in the database), C2 is the inherited security level (highest level found starting from the pictures_dir).
Login to phpGraphy with an administrator account and you'll see a link called "manage users" in the top right menu, simply click on it and the rest shoud be self-explanatory
You've several choices to upload pictures, the most convenient being to upload via FTP (or copy directly if this is your own server) the pictures/directories into phpGraphy pictures_dir (default to pictures/). If you've no other choice or if you find it more convenient, you can also use the web interface by cliking on the upload pictures link from the admin menu.
You have two differents ways to change a picture title.
Simply enter a description by using the form field (ref: B1) and once done, validate your change by clicking on the Change button (Ref: C3)
phpGraphy is able to automatically set the picture title using the IPTC field of your choice. You can do this by editing the configuration file and setting-up the value of iptc_title_field to one of keyword listed in the EXIF/IPTC keywords reference table.
To change a picture or directory security level, authenticate yourself as an admin an then simply browse to the picture/directory you want to change the level. You'll see a "Level" field (Ref: C1), please before doing so, check the "Inerithed level", because if the "Inherited Level" is higher or equal to the level you want to set, there is no need to change the level as the picture/directory is already protected (See Understanding Users Level).
The .welcome is a file that is automatically read and displayed on the first page of each directory when in browsing mode. You can edit its content either via the interface using the "Edit .welcome" button when authenticated as admin, or via your favorite text editor and then uploading it to the directory where you want the text to be displayed (this directory must be within pictures_dir).
The beauty of the .welcome is that you can also include HTML code directly inside, thus making the possibilities endless. For example, you can add links (like shortcuts to directories, you can include images (ie: picture of the month),etc but as an example may be better than thousands of words, copy/paste the following code to your .welcome (don't forget to adapt the link to your site)
        Below is a link to the last commented pictures:
        <a href="index.php?lastcommented=">Last commented pictures</a>

        Below is a link to a specific directory:
        <a href="index.php?dir=path_of_a_directory">Direct access to a directory</a>

        Below is an image inclusion:
        <img src="index.php?display=path_of_your_picture" />
Appart from the normal image browsing, phpGraphy does have some special pages that are used along with the comments, rating, etc. Ideally a link to all of those features should be included in the default theme but I haven't been able to figure out yet, a proper way of doing so without deforming too much the actual simplicity of the interface, suggestions are welcome !
This page display the last commented pictures, you can access it with the default theme by clicking on the "last comments" link. This function use the current browsed directory to only include its content and the subdirectories in the result. If nothing is specified as argument, it consider the current directory as being root and such will include everything. The following configuration directives can affect the behaviour of this page
Using the .welcome or by modifying the templates, you can add a link to this special page by creating a link like the one below:
<a href="index.php?lastcommented=">Last commented pictures</a>
This page display the top rated pictures (also known as Top ratings), the following configuration directives can affect the behaviour of this page:
Using the .welcome or by modifying the templates, you can add a link to this special page by creating a link like the one below:
<a href="index.php?topratings=1">Top rated pictures</a>.
This page display the last added pictures, the whole content of pictures_dir will be parsed and the files with the most recent timestamp will get display. Unlike the next special page (Last added pictures per dir), if you have uploaded a bunch of files in the same directory, you will only see the pictures from this directory, if you want to only have one file listed per directory, use the "Last added pictures per directory" function. The following configuration directive can affect the behaviour of this page:
Using the .welcome or by modifying the templates, you can add a link to this special page by creating a link like the one below:
<a href="index.php?lastaddedpictures=1">Last added pictures</a>.
This page display the last added pictures per directory, in others words, it will only display the most recents file of each directory. This is very useful if you are uploading pictures in the same directory but still want your users to be able to see the previous updates, it could be assimilated to a Last updated directories feature. The following configuration directive can affect the behaviour of this page:
Using the .welcome or by modifying the templates, you can add a link to this special page by creating a link like the one below:
<a href="index.php?lastaddedpicturesperdir=1">Last added pictures per directory</a>.
This part explain how to delete comments posted by visitors.
To do so, you need to be authenticated as admin, then browse to the picture containing the comment(s) you want to delete, you'll see a "Delete" link just next to the date of the comment (Ref: D1), click on the link, confirm the action et voila.
So you want to make it the hard way, up to you ! You'll have to do manually what is normally done automatically by phpGraphy.
Create a
.thumbs/subdirectory under the directory where you've your original pictures.Upload thumbnail version of your pictures into the
.thumbs/directory following this naming convention. Add thethumb_prefix followed by the original filename (eg: for a file namedtest.jpg, upload a thumbnail namedthumb_test.jpg).Upload low-resolution version of your pictures into the
.thumbs/directory following this naming convention. Add thelr_prefix followed by the original filename (eg: for a file namedtest.jpg, upload a thumbnail namedlr_test.jpg).
Introduced with release 0.9.11, your directories can now be represented by a "Cover Picture" within a frame and some information next to it. This feature is called "Directory Cover" and is dependand on the configuration directive directory_display_mode.
By default, every directory has no "Cover Picture" set, it'll just show a question mark instead. To set this "Cover Picture", there's two possibles ways. The first and most simple is to click on the frame's icon available next to every picture (only in admin mode). The second one is to use the select list in the "Directory Settings" fieldset. By using this select menu, you'll even be able to select a "Cover Picture" of another sub-directory and also remove the current one.
Thumbnails and low-resolution pictures are generated on-the-fly by phpGraphy, that means if it doesn't already exists when a user is requesting it, phpGraphy will generate it. You may want to generate them all in advance (ie: for performance issues), this can be accomplished by several ways:
When logged-in as admin, using the Batch Processing menu.
From the command line or from a crontab, you can call the script with the batch_action=generateall as argument (For this to work you need php-cli to be installed).
/yourpath_to_phpgraphy/index.php batch_action=generateall
Starting from release 0.9.11, configuring phpGraphy is much more easier, there is now a nice GUI (Graphic User Interface) in addition to the traditionnal manual editing.
Using the GUI - The graphical interface is accessible once logged-in as admin by clicking on "phpGraphy Settings" in the admin's menu. You'll be able to browse through the left menu to review and/or modify the different configuration options. Note that some directives are not modifiable via the interface as setting a bad value might break your configuration, you'll have to use the manual method to change those ones. Some directives are marked with a red note that recommend the use of the installation process as they might also break some part of your site if misconfigured.
Doing it manually - The use of this method is recommended for advanced users or if you've become very familiar with phpGraphy and want to modify a directive which could not be set via the GUI. phpGraphy configuration is now based on a ini file called config.ini.php located in the conf/ sub-directory of your installation. Even tough the filename finish with a .php extension, the file follow the .ini format. It should only contain directives which have a different value from phpGraphy's default (See phpGraphy initialization process(FIXME:Create link). For a list of allowed directives, please refeer to the next section Configuration directives reference
-
admin_ip Category: main/misc (Advanced)
Type: string
Your IP address, it need to be provided during the installation procedure so that nobody else is able to create an administrator account on your behalf. If you don't know what your IP address is don't worry it will be given to you during the installation procedure.
Example: "193.29.43.244", "192.168.0.1", "127.0.0.1"
-
convert_path Type: string
Obsolete since version: 0.9.11
Replaced by: thumb_generator_path
If you use convert as $config['thumb_generator'], you can specify its path using this directive (leave blank for auto detection).
Example: "/usr/bin/convert"
-
cover_picture_mode Category: display/layout
When using the 'picture' mode of 'directory_display_mode' and no cover picture is actually set for a directory, what should phpGraphy do about it ? 'random' Select automatically one random picture from the directory 'manual' Don't do anything and let you handle the situation Note that the 'random' mode can slow down your site as it does scan the content of every directory without cover.
Default value: random
-
data_dir Category: main/path (Advanced)
Type: string
Path to data files (with a trailing slash '/'). This directory is mainly used with the flat file database backend but it contains also others data files like one for the EXIF function.
Example: "data/" or "../data/"
Default value: data/
-
database_type Category: main/database
This define your database backend. For now, you have the choice between 'file' for default Flat Files Database and 'mysql' for MySQL.
Default value: file
-
db_host Category: main/database (Advanced)
Type: string
Name of the host running the MySQL database, if you don't know try the default setting 'localhost', else ask your hosting compagny. NOTE: Only needed if using MySQL.
Example: 'localhost', 'mysql.provider.com'
-
db_name Category: main/database (Advanced)
Type: string
Name of the database that will contain phpGraphy tables. NOTE: Only needed if using MySQL.
Example: 'phpgraphy', 'accountname'
-
db_pass Category: main/database
Type: string
Password of your MySQL account. NOTE: Only needed if using MySQL.
-
db_prefix Category: main/database (Advanced)
Type: string
Prefix used for phpGraphy tables NOTE: Only needed if using MySQL.
Example: 'phpg_', 'phpgraphy_'
-
db_use_mysql_pconnect Category: main/database (Advanced)
Enable/disable MySQL persistent connection 'mysql_pconnect()' See http://www.php.net/manual/en/features.persistent-connections.php for details. NOTE: Only needed if using MySQL.
Default value: 1
-
db_user Category: main/database (Advanced)
Type: string
Username of your MySQL account. NOTE: Only needed if using MySQL.
-
debug_mode Category: main/behavior (Advanced)
Change verbosity of the errors messages. If you have any problems that you can't resolve, start by increasing the value of this setting. Keep also in mind that setting a high level of debugging might reveal details about your configuration. 0 = disabled, 1 = normal, 2 = verbose, 3 = development/debugging, 4 = development/debugging+
Default value: 2
-
default_file_permissions Category: main/behavior (Advanced)
Type: int
If set, file permissions will be changed to the value specified here, acceptable values are the same as the ones accepted by the chmod command of the form 0xxx. See http://php.net/manual/en/function.chmod.php for details
Example: '0664', '0644', '0600'
-
directory_display_mode Category: display/layout
Choose the way you want to display directories when in browsing mode. 'picture' display a picture with a nice frame border effect around, handle directory title and also display statistics for each directory (numbers of files and sub-directories) 'icon' display a small folder icon just before the directory name. 'name' oldschool mode, only display the directory name.
Default value: picture
-
dirs_sort_by Category: display/layout (Advanced)
Default sort method for directory, you can choose between 'filename' (default) and 'datetime'.
Example: "filename" or "datetime"
Default value: filename
-
dirs_sort_order Category: display/layout (Advanced)
Default sort order for directories, you can choose between 'asc' (default) and 'desc' (reverse)
Example: "asc" or "desc"
Default value: desc
-
exclude_files_preg Category: display/pictures (Advanced)
Type: string
This variable contain a perl regexp (Regular Expression) of files/directories to exclude when parsing directories. Please modify it carefully as an improper value may break your whole site and/or render previously invisible files visible.
Default value: /^(\..*|_comment|thumbs.db)/i
-
files_sort_by Category: display/layout (Advanced)
Default sort method for files, you can choose between 'filename' (default) and 'datetime'.
Example: "filename" or "datetime"
Default value: filename
-
files_sort_order Category: display/layout (Advanced)
Default sort order for directories, you can choose between 'asc' (default) and 'desc' (reverse)
Example: "asc" or "desc"
Default value: asc
-
highest_rating Category: modules/rating
Type: int
The maximum rating that can be given to a picture, from 1 to this number Change this carefully, especially if you have already some pictures rated as it would falsify the results.
Default value: 5
-
highres_min_level Category: display/pictures
Type: int
Mininum level to be able to see high resolution pictures, Value can be from 0 to 999. "1" means that you need to be authenticated to see them, "0" mean that everyone as access to them.
Default value: 1
-
icons_dir Type: string
Obsolete since version: 0.9.11
Path to icons/images used by phpGraphy (with trailing '/'), default should be fine in most cases.
Example: "graphics/" or "someothername/"
-
install_mode Category: main/misc (Advanced)
Enable install_mode, you'll then be redirected to the installation process pages
-
iptc_title_field Obsolete since version: 0.9.11
Replaced by: metadata_title_field
This define which IPTC field should be used to fill (if empty) the picture title/description.
Example: 'Iptc.ObjectName' or 'Iptc.Headline'
-
language_file Category: main/lang
Change the default language to one available in base/lang/ directory. Please note that the english language will still be used as fall-back, so if you get some english text, it means that the external language file is incomplete.
Example: "lang_fr.inc.php"
-
lr_limit Category: display/pictures (Advanced)
Type: string
Size (in bytes) where we generate a low resolution picture. Basically, if the picture is bigger than this size, a low resolution picture will be generated.
Example: "1024*100" mean that if a picture is more than 100KBytes, we generate a low res.
Default value: 102400
-
lr_quality Category: display/pictures (Advanced)
Quality (from 10 to 100) of the generated low resolution pictures.
Default value: 80
-
lr_res Category: display/pictures
Type: string
Size (in pixels) of the generated low resolution pictures.
Default value: 800x600
-
metadata_title_field Category: modules/metadata
This define which EXIF/IPTC field should be used to fill (if empty) the picture title.
Example: 'Iptc.ObjectName' or 'Iptc.Headline' or 'Exif.JpegComment'
Default value: Iptc.ObjectName
-
movie_extractor Category: main/imagetools
Tool used to extract frames from movies and generate a thumbnail from it "ffmpeg" requires exec() permission and the ffmpeg binary to be installed and accessible from php. "none" is the default choice
Default value: none
-
movie_extractor_path Category: main/imagetools (Advanced)
Type: string
If you use ffmpeg as 'movie_extractor', you may have to specify its path using this directive if not autodetected (ie: not in the $PATH, %PATH%).
Example: "/usr/bin/ffmpeg" or "C:\FFmpeg\FFmpeg.exe"
-
nb_col Category: display/layout (Advanced)
Type: int
Maximum number of columns per page to display the thumbnails. See also nb_thumbs_max.
Example: "5" mean that you'll get 5 columns of pictures per page
Default value: 3
-
nb_last_added Category: modules/lastadded
Type: int
Numbers of pictures/directories on the last added pictures/directories page
Default value: 10
-
nb_last_commented Category: modules/comments
Type: int
Numbers of pictures on the last commented pictures page
Default value: 10
-
nb_pic_max Type: string
Obsolete since version: 0.9.11
Replaced by: nb_thumbs_max
Maximum number of pictures per column (2 columns per page)
Example: "5" mean that you'll get 10 pictures per page
-
nb_thumbs_max Category: display/layout (Advanced)
Type: int
Maximum number of thumbnails per page. See also nb_col.
Example: "10" mean that you'll get 10 pictures per page
Default value: 12
-
nb_top_rating Category: modules/rating
Type: int
Numbers of pictures on the top rated pictures page
Default value: 10
-
picture_link_action Category: display/layout (Advanced)
Action when clicking on a picture (lowres/highres) in display mode 'nextpic' Jump to the next picture of the current directory (or a random one when in random mode) 'switchres' Switch between High Resolution and Low Resolution pictures. Note that access to High Resolution pictures is limited by highres_min_level, such if the user hasn't sufficients privileges, the link won't even be displayed.
Default value: nextpic
-
pictures_dir Category: main/path (Advanced)
Type: string
Path to your pictures (with a trailing slash '/'), replace the old $root_config variable
Example: "pictures/" or "/home/http/htdocs/pictures/" or "../pictures/")
Default value: pictures/
-
postcomment_min_level Category: modules/comments
Type: int
Minimum level required to post comments on images. 0 means that everybody (including non authenticated visitors) can post comments. Any value greater than 0 means that you need to be authenticated will a level at least equal to the one specified here.
-
rating_pre_votes Category: modules/rating (Advanced)
Type: int
When using 'average' as rating_score_mode, add some default votes with an average rating, this is to avoid that a picture with a single vote of 5 get a highest final rating than a picture with 4 votes of 5 and 1 vote of 4. It can be assimilated to a counter-balance. Value is a integer between 0 and 9.
Default value: 3
-
rating_score_mode Category: modules/rating
Choose the way the global rating (score) is calculated for a picture. 'average' - Add the sum of all votes plus the rating_pre_votes and divide by the number of votes 'formula' - Use a formula that will compute average rating and number of votes to give a score. This method give a better thought as the number of votes as a real impact on the final score.
Default value: average
-
root_dir Type: string
Obsolete since version: 0.9.11
Replaced by: pictures_dir
Path to your pictures (with trailing '/').
Example: "pictures/" or "/home/http/htdocs/pictures/" or "../pictures/")
-
rotate_tool Category: main/imagetools
Tool used to losslessly rotate your pictures. You can choose between "exiftran" and "jpegtran", both require exec() permission and of course the choosen binary need to be accessible from php. "manual" is an equivalent to disabled as it will hide the rotate options. note: "auto" is obsolete since 0.9.11
Default value: manual
-
rotate_tool_args Category: main/imagetools (Advanced)
Type: string
Use this variable to redefine default arguments passed to rotate_tool, change this with care, default should be fine in most cases.
Example: for jpegtran, "-copy all -perfect"
-
rotate_tool_path Category: main/imagetools (Advanced)
Type: string
If you've setup a rotate_tool and it doesn't work, you might need to specify its path here.
Example: "/usr/bin/exiftran"
-
script_name Category: main/behavior (Advanced)
Type: string
Use *ONLY* if you have problem with forms. On some PHP installation, the global variable SCRIPT_NAME is filled with erronous values. It should normally contain the path to access your page like "/phpgraphy/index.php" or "index.php" but in some cases it get filled in with values like "/cgi-bin/php" If you're in this case, use this directive to correct the problem.
Example: "index.php" or "/phpgraphy/index.php"
-
theme Category: display/layout
Name of the active theme (located under themes/ with a valid theme structure)
Example: "default", "mytheme"
Default value: default
-
thumb_aspect Category: display/pictures
Aspect of generated thumbnails. 'normal' (default) preserve the ratio between width and height, the largest side won't be larger than the one specified in thumb_res. 'square' picture is cropped in the center, also note that only the left number of thumb_res is used.
Default value: normal
-
thumb_generator Category: main/imagetools
Tool used to generate thumbnails/lowresolution pictures. "gd" is the default and recommended choice. "convert" requires exec() permission and the ImageMagick to be installed and accessible from php. "manual" is a fallback choice if you want to handle thumbnails and low res images yourself. note: The "auto" option is obsolete since version 0.9.11
Default value: gd
-
thumb_generator_path Category: main/imagetools (Advanced)
Type: string
If you use convert as 'thumb_generator', you may have to specify its path using this directive if it's not autodetected (ie: not in the $PATH, %PATH%). note: This directive replace the old 'convert_path' one
Example: "/usr/bin/convert" or "C:\ImageMagick\convert.exe"
-
thumb_quality Category: display/pictures (Advanced)
Quality (from 10 to 100) of the generated thumbnails
Default value: 60
-
thumb_res Category: display/pictures
Type: string
Size (in pixels) of the generated thumbnails, width per height. Note that thumb_aspect will influes on the final dimensions by preserving or not the aspect ratio.
Example: "100x100"
Default value: 100x100
-
thumbs_order Category: display/layout (Advanced)
Set the order to display the thumbnails L2R (left to right starting from the top), T2B (top to bottom starting from the left), R2L (right to left starting from the top)
Example: "L2R" mean that you'll get the first picture on the top left corner and
Default value: T2B
-
use_comments Category: modules/comments
Enable/Disable the use of the comments system
Default value: 1
-
use_direct_urls Category: main/behavior (Advanced)
Type: int
WARNING - Read very carefully what will happen if you enable this feature. If set to 1, phpGraphy will try to use whenever possible direct links to pictures. This is a huge benefit performance wise, however than means that people can browse through your pictures directory directly (without the phpGraphy interface). It is not recommended to use the flat file database along with this option as people will be able to see some data files stored in the pictures directory. To summarize, enabling this option completely disable any "security level" feature of phpGraphy. Note that you need to remove the default .htaccess file located in the pictures/ directory so that pictures become directly accessible (such direct_urls name). This option is recommended for popular public sites along with mysql as backend database.
-
use_exif Category: modules/metadata
Enable/Disable the use of the EXIF metadata. If enabled, EXIF metadata will be displayed under each picture that contains such information. Note that you can customize the display of thoses informations by using your own custom language file.
Default value: 1
-
use_flock Category: main/behavior (Advanced)
Enable/Disable "File Locking" mechanism. This option is only used with the flat file database backend and is HIGHLY recommended to avoid data loss due to concurrents writing access. It may be turned off on small sites but if you've have to turn it off, I would rather recommend you to use MySQL.
Default value: 1
-
use_iptc Category: modules/metadata
Enable/Disable the use of the IPTC metadata. If enabled, IPTC metadata will be displayed under each picture that contains such information.
Default value: 1
-
use_ob Category: main/behavior (Advanced)
Enable/Disable "Output Buffering". You can improve performance by more than 20% if enabled but you might also have some border effects in some very specific cases.
-
use_rating Category: modules/rating
Enable/Disable the use of the rating system
Default value: 1
-
use_sem Category: main/behavior (Advanced)
Enable/Disable "Semaphore" mechanism. This option is only used when you've choosen 'convert' as thumb_generator. It allow to restrict the number of simultaneous processes and such will limit the use of your CPU when generating all thumbnails/lowresolution pictures. This feature is still experimental, use it carrefully.
-
use_session Category: main/behavior (Advanced)
Enable/Disable session authentication scheme. On some servers, it's not available/possible, and such you won't have the choice but to use the default cookie authentication mechanism. If use_session is enable, checking the 'remember me' box on the login page will use cookie instead of session authentication scheme.
Default value: 1
Table of Contents
From the beginning, phpGraphy has been built to be highly customizable, depending on your IT knowledge, you may be able to modify more or less things. The first place to look is probably the configuration menu (called "phpGraphy Settings") that is available once authenticated as admin, you'll have access to all the configuration options listed in the previous chapter (phpGraphy Configuration) but via a nice graphical interface.
If you want to modify the text, see Creating our own personal language file. If you want to modify colors and appearance, you might want to create your own theme (See Creating a theme. Here is a list of things you can customize :
Colours, Layout (Required knowledge: HTML, CSS styles)
Text, language (Required knowledge: Text Editing)
One last thing, a lot of people are wondering how to modify the title of the website, you've actually to ways of doing it but I'll only explain the recommended way which consist of following the instructions Creating our own personal language file and set the $txt_site_title variable to whatever your want.
phpGraphy use the system of header/footer combined to templates, this way you have a very fine control of your website aspect. If you simply want to change colors, font attributes (font itself, size, color) and spacing etc... everything is controled by CSS. If you want to customize more deeply, you might want to edit the templates.
Here is the list of the three files used to control the layout :
phpgraphy.cssheader.inc.phpfooter.inc.phptemplates/*(Every file located in this directory)
For php beginners, here is an example on how to modify header.inc.php so that the logo isn't displayed in popups (addcomment and editwelcome)
            ---- bottom of header.inc.php in phpGraphy 0.9.11 ----
            <div <?php if (!$_GET['popup']) echo 'id="main"'; ?>>
            <a href="<?php echo basename($_SERVER['SCRIPT_NAME']); ?>"><img src="<?php echo $base_images_dir ?>phpgraphy-banner.gif" alt="phpGraphy banner" id="banner" /></a>

            ---- modification example if you do not want to have the logo included in popup mode ----
            <div <?php if (!$_GET['popup']) echo 'id="main"'; ?>>
            <?php if (!$_GET['popup']) : ?>
            <a href="<?php echo basename($_SERVER['SCRIPT_NAME']); ?>"><img src="<?php echo $base_images_dir ?>phpgraphy-banner.gif" alt="phpGraphy banner" id="banner" /></a>
            <?php endif; ?>
Starting from release 0.9.11, phpGraphy now support a theme system which make it very easy to change the layout and/or create a new one. Themes are located under the themes/ sub-directory of phpGraphy and the default theme is logically located under default/.
To create your own theme, please follow the steps indicated below:
Copy the default theme directory
default/to the name of your new theme, beware that the directory name must not be longer than 20 characters and should only be composed of lowercase letters, numbers, and the two special characters '-' and '_' (without the quotes).Within your new theme directory, edit the file
theme_info.inc.phpand modify the information contained under the $theme_info array accordingly. The theme_name is the most important as it'll be used when displayed within phpGraphy configuration GUI. Others variables are important only if your theme is going to be public.Optionnaly, you can copy the file
lang_cust.inc.php.sampletolang_cust.inc.phpand phpGraphy will auto-magically overide the current language file with its content. For a list of the possible variables, please refeer to the english language filebase/lang/lang_en.inc.php. You'll see while opening the sample file that it does contain some examples and that it's pretty easy to modify it. For example, you can change the title of your website by modifying $txt_site_title.Finally, if you want to customize the inside of the applications, you can edit the templates (located under the
templates/of your theme). Please refer to the next section for more details about templates.
The templating system was introduced in version 0.9.12, the choice was made to use Flat-Frog (previously known as Smarty-Light) which does basically uses the same syntax as Smarty but with much less functions, making it *lighter* (thus the previous name).
You don't need special knowledge (besides HTML/CSS) in order to take advantage of the templates, just open one of them and with the help of the inline comments, you should get the expected result(s) pretty quickly.
For those who are not familiar with the concept of templates, it's basically called by the main program (index.php) at the final phase (display), it will load the template, replace every content that need to be replaced and output HTML.
There is for now (release 0.9.12) 4 differents templates:
browse.tpl- Used when browsing directoriesdisplay.tpl- Used when viewing pictures (eith lowres or highres)top-and-last.tpl- Used for lastcommented/lastadded and toprated pictures pagesnavbar.tpl- Navigation bar (used in all templates)
If you want to customize the templates, please start by creating a new theme.
If you want to customize an existing language file just for your site (as opposed to create a new official language file), follow the instructions from step 3 of Creating a theme but don't create the whole theme, just do the lang_cust.inc.php bit.
Everything (or at least almost) regarding language with phpGraphy is controlled using external languages files located in base/lang/. The default and reference language file is the english one (lang_en.inc.php) must NOT be edited. There is others languages available, courtesy of volunteers translators but they might not be always uptodate, if this is the case, then the displayed text will fall-back to the default english content.
Creating an official language file and customizing a bit an existing one is a different task. If you want to contribute to phpGraphy by submitting a language file, please visit the TranslatorPage of the Development Website, you'll find instructions on how to proceed.
If you just want to customize a bit of a language file, then read the previous paragraph Creating our own personal language file
The EXIF and IPTC are automatically displayed in a nice and customizable way under each picture that contain such metadata if use_exif and/or use_iptc are enabled. See attached Screenshot at the end of this part.
To customize the EXIF/IPTC fields, the recommended way is to create a custom language file (as indicated when creating a new theme) and modify the following variables:
$txt_exif_custom
$txt_exif_missing_value
$txt_exif_flash
$txt_iptc_custom
$txt_iptc_missing_value
The original variables are located inside the default language file base/lang/lang_en.inc.php but as recommended for any modification that affect language files, please DO NOT edit directly lang_en.inc.php, instead follow the instructions given in the last step of Creating a theme.
$txt_exif_custom and $txt_iptc_custom act in the same way, they're both special variables that can contain keywords (See EXIF/IPTC keywords reference table) which will be automatically replaced by metadata. A keyword must be encapsulated between % like this %Exif.Make% or this %Iptc.City%.
Here is a example showing how to use $txt_exif_custom
$txt_exif_custom="%Exif.Make% %Exif.Model%<br>%Exif.ExposureTime%s";
This will be displayed as follow:
"Canon D30<br> 1/60s" in the case of the picture was taken with a Canon D30 at the Speed of 1/60
For a complete list of available Keywords please see EXIF/IPTC keywords reference table
$txt_exif_missing_value and $txt_iptc_missing_value act in the same way, if a requested keyword is not found inside the picture metadata, the keyword will be replaced with the value of this field.
For example with $txt_exif_missing_value="??" and the same $txt_exif_custom as in the previous example.
If the picture doesn't contain the %Exif.ExposureTime% field, it will be display as follow:
"Canon D30<br> ??s"
Note that phpGraphy try to be intelligent and if the picture doesn't contain any metadata, it won't display anything. This will avoid to get a EXIF/IPTC field full of "??" or whatever you've set.
To display the 35mm equivalent for camera that doesn't embed this information to the EXIF metadata, phpGraphy rely on a external sensors database (stored as base/data/sensors.dat). There is also an online tool that enable you to play live with the 35mm Equivalent by choosing your camera type and entering the focal lenght, see it in action 35mm Equivalent Focal Lenght Calculator.
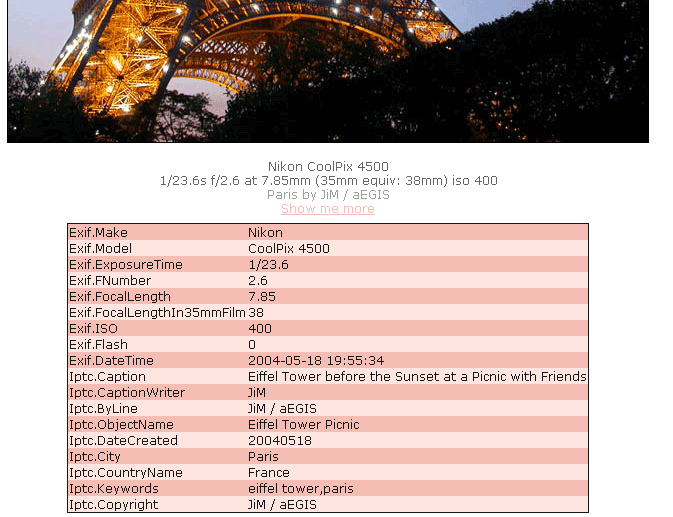
Table of Contents
phpGraphy is composed of several directories, some of them must NOT being accessible from the evil Internet by browsing your website. There's actually four sensitives directories :
pictures/, conf/, logs/ and if using Flat File database data/
To check that there aren't accessible, you just need to use your web browser and add the directory name after the normal URL used to access phpGraphy, for example, if the URL to access your phpGraphy installation is http://myprovider.com/phpgraphy/, then just check the following urls :
http://myprovider.com/phpgraphy/pictures/
http://myprovider.com/phpgraphy/data/users.dat
http://myprovider.com/phpgraphy/conf/
http://myprovider.com/phpgraphy/logs/
You must either have a "404 Not Found" (this will be the case if you've moved your directories) or "Not allowed"
Warning
If you get a "403 Access denied" when requesting a directory, it could simply mean that the directory listing is prohibited but malicious people might still be able to guess URLs by also providing a filename such don't forget to test access to the file directly (ie: example above with users.dat)If your site seem to or simply isn't secure, then please read the next section Protecting sensitives directories.
In order to protect the sensitive directories, you've several choices. We'll only talk about the two most common choices.
Move the sensitives directories in a place NOT accessible from Internet
Unfortunately even if this solution is the best of both choices, it's not always possible as some shared hosts provide access to a single place which is also accessible via http.
First, you need to make sure that you can do that, if you've your own webserver, then you definitively can. If you're using a shared host, then think about where you need to put your files when uploading them by FTP, do you have to enter under a specific directory like
htdocs,public_html/or whatever it's used by your ISP.If yes, then this means that any content not under this
htdocs/(or whatever name is used by your ISP) will NOT be accessible from the Internet. Then, you need to move each sensitive directory (ie:pictures/,data/) at the root of your FTP access and change phpGraphy config according your changes by changing the path of pictures_dir and eventually data_dir if you're using the flat file database backend. Note that you can not apply this technique tologs/andconf/, you'll need to apply the other technique (see next section)./home/ftpuser/ | +- htdocs/ phpGraphy core files (*.php, etc.) - Need to be accessible from Internet | +-base/ phpGraphy core library, stylesheets, icons, etc. - Need to be accessible from Internet | +-themes/ phpGraphy themes (You can add your own also) - Need to be accessible from Internet | +-docs/ phpGraphy manual and documentation - Can be accessible or not, up to you | +-conf/ phpGraphy configuration files - If possible, restrict access | `-logs/ phpGraphy log files - If possible, restrict access | +- pictures/ This is where you put your own pictures/files - Should NOT be accessible from Internet `- data/ Used along with the flat file database (not MySQL) - Should NOT be accessible from InternetTo get phpGraphy working like the above example, add the two following lines in
config.ini.php:pictures_dir = "../pictures/" data_dir = "../data/"
Using .htaccess files
phpGraphy comes by default with
.htaccessin all *sensitive* directories. However it's possible that those files aren't in place anymore (for example, if you've uploaded phpGraphy with a FTP client not correctly handling files beginning with a dot) or also that your webserver doesn't handle such files.The easiest way is to get those
.htaccessgiven by default with phpGraphy back in place using the original archive and if not working trying with another decent FTP client. If your webserver doesn't this type of files, check for an equivalent, there should be one.I'll not explain here how
.htaccessworks, if you're curious, you favorite search engine should be able to help you with that ! Just note that the role of.htaccessis to forbid access to directories and its content. There should be a similar method available with the webserver you're using.
Note
This section is a small introduction to some security pratices, it definitly can NOT substitute any serious security book or article.It is recommended to pay a special attention when choosing a password. Here is a check list of the most important :
Use (at last) six characters lenght passwords
Don't pickup to easily guessable password (Name of your girlfriend, favorite pet, birthday date, etc.)
Never use the same password twice (Some people tend to use the same password everywhere but if someone find your password, this mean he/she will have access everywhere you've used the same password).
This section explain how the cookie authentication mechanism is handled in phpGraphy.
In order, to authenticate yourself with phpGraphy the first time, you must provide a valid login/password. Once you've prooved who you are, phpGraphy set a cookie on your computer with the CookieValue defined in the users base (See Managing users account). It's this CookieValue which is then used to identify you to the website. To resume, the user/password is used to get the Cookie from the site but if you can guess the cookie directly, it does lead to the same result: Authenticated Access to an account. When using the interface to create a new user, the generated cookie is complex enough to render brute-force attacks painful, but that can be destroyed if you don't pickup a strong-enough password.
phpGraphy has been developped with security and simplicity as a key argument but as no software can be perfect, it's certain that someone someday may find a security hole/bug. If you have found one, please contact the phpGraphy DevTeam (See Contact section of the website) prior to making the flaw public. This way, we'll ensure that there is patched version available and conscensiou site sadministrators will be able to patch in time.
Glossary
- .welcome
.welcomeis a file used in phpGraphy (and also others program) as an intro text when entering a directory. It's displayed only when browsing directory and will be shown just before the directory content (sub-directories or thumbnails) - See Editing the .welcome.- cookie
A cookie is a coded piece of information, stored on your computer, that identifies your computer during the current and subsequent visits to a web site.
- shell
A shell is a program that provides the traditional, text-only user interface for Unix-like operating systems. Its primary function is to read commands that are typed into a console (i.e., an all-text display mode) or terminal window (an all-text window) and then execute (i.e., run) them.
Table of Contents
You've a problem with phpGraphy, something isn't working as it should, here are some tips to help you trace/resolve the problem by yourself.
The first thing to do, is to increase the value of debug_mode, follow the instructions from Changing the configuration if you don't know how to do that.
Once your value of debug_mode is set to 2 (or even 3 if 2 isn't enough), reload the page where you've a problem and look at the log file located under the logs/ subdirectory of phpGraphy. Note that you can view the last 20 lines online when authenticated as admin via the admin menu, it will only be available when debug_mode value is greater or equal to 2.
If this doesn't help you, ask for some help by following the instructions in the help section of phpGraphy website.. Don't forget to give a detailed description of your problem, the version of phpGraphy you're using, platform etc..
This part list and describes the tool that you may need in order to fully uses phpGraphy.
- phpMyAdmin
phpMyAdmin is a tool written in PHP intended to handle the administration of MySQL over the Web. Currently it can create and drop databases, create/drop/alter tables, delete/edit/add fields, execute any SQL statement, manage keys on fields, manage privileges,export data into various formats and is available in 47 languages.
Download it from phpMyAdmin website
- convert
convert is one of the utilities bundled with the ImageMagick package, it permits a lot of images operations like converting from one format to another, resizing, rotating, etc..
Download it from ImageMagick website
- A.3.1. Thumbnails are not generated, why ?
- A.3.2. I can't login - It does return a 404 error, page not found
- A.3.3. Why can I see some FIXME in this manual ?
| A.3.1. | Thumbnails are not generated, why ? |
Well, I think it's the most common problem encountered by users, here is a small check list
| |
| A.3.2. | I can't login - It does return a 404 error, page not found |
The value of SCRIPT_NAME isn't filled properly by the PHP installation, you need to overide it by using the script_name directive. As you're unable to authenticate, you'll have to edit conf/config.ini.php manually and add the following line script_name = "index.php"
| |
| A.3.3. | Why can I see some FIXME in this manual ? |
This entry is only here because some sections of this manual are not yet fully complete and the keyword FIXME is used to locate them. |
This table contains the list of EXIF/IPTC handled by phpGraphy. You will find the most common used EXIF/IPTC fields, the list may grow from version to version but will still only contain the most important tags to keep it efficient and clear.
Table A.1. Metadata keywords list